When the sun is shining and laughter fills the air, I can’t help but think of delightful snacks that spark joy. Enter the whimsical world of Mouse Cheese Crackers—the cutest appetizers that are sure to brighten any gathering, from birthday parties to backyard picnics. These no-bake wonders not only bring a smile to my kids’ faces, but they’re incredibly simple to whip up, making them a go-to choice for busy days when you want to impress without the fuss.
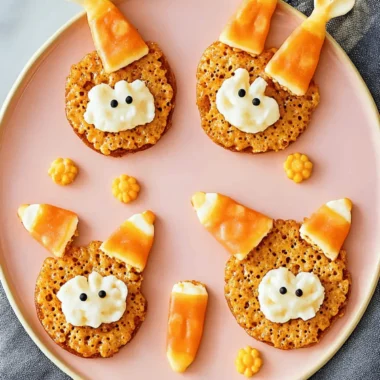
Picture this: creamy cheese shaped into playful mouse heads resting on crunchy crackers, complete with playful cucumber whiskers and tiny chocolate-chip eyes. It’s a fun culinary adventure that encourages creativity, allowing every child (and adult!) to join in on the delightful assembly. Whether you’re looking to add a unique touch to your next party spread or just want to elevate snack time, these Mouse Cheese Crackers are the tasty, kid-approved solution you didn’t know you needed! Let’s dive into this delightful recipe together.
Why Are Mouse Cheese Crackers So Adorable?
Endless creativity: Kids can customize their Mouse Cheese Crackers with different toppings and shapes, making each creation uniquely theirs.
No-bake simplicity: With just a few ingredients, these bites are quick to prepare — perfect for busy parents looking to add fun to snack time.
Kid-friendly appeal: Who can resist the charm of little mice made from cheese? They’re sure to be a hit at any gathering!
Flavorful bite: The delicious combination of creamy cheese, crunchy crackers, and playful toppings offers a delightful contrast that everyone will enjoy.
Perfect for every occasion: Whether for festivals, picnics, or as an everyday treat, these appetizers are versatile and can easily bring joy to any setting.
Engaging family fun: Making these together is an excellent opportunity for family bonding and encourages your little chefs to explore their creativity in the kitchen!
Mouse Cheese Crackers Ingredients
For the Mouse Heads
• Triangle cheese (e.g., Laughing Cow) – Creamy texture; acts as the main component for the mouse’s head, but feel free to use Brie or goat cheese for a twist.
• Crackers – Provide a crunchy base; choose mild-flavored options to complement the cheese and let its flavor shine.
For the Mouse Features
• Mini chocolate chips – These add sweetness and serve as the adorable eyes of the mouse; raisins can also be a fun substitute!
• Sliced cucumber – Adds freshness and crispness; use for the whiskers, or swap in carrot sticks for a vibrant touch.
• Pepperoni – Sliced for ears and nose, lending protein and flavor; you can also use salami or ham as tasty alternatives.
These ingredients come together to create delightful Mouse Cheese Crackers, ensuring a fun and delicious treat that kids will love!
How to Make Mouse Cheese Crackers
- Prepare the pepperoni: Start by slicing the pepperoni into mini rounds for ears and small pieces for the nose. Aim for playful sizes to ensure your mouse snack looks adorable!
- Add cheese to crackers: Place a slice of triangle cheese on each cracker to form the mouse’s head. This creamy base is what makes these Mouse Cheese Crackers so delightful and tasty!
- Assemble the mouse: Grab those mini chocolate chips and arrange them on the cheese to create charming little eyes, then add the pepperoni slices for ears.
- Create the whiskers: Cut slivers of cucumber and place them on the sides of the cracker as whiskers. Get creative with the arrangement for a whimsical appearance!
Optional: Add a sprinkle of herbs for extra flavor and a pop of color!
Exact quantities are listed in the recipe card below.
Make Ahead Options
These Mouse Cheese Crackers are fantastic for meal prep lovers! You can slice the pepperoni and cucumbers up to 24 hours in advance, storing them in airtight containers in the refrigerator to keep their freshness intact. Additionally, you can prepare the cheese and crackers by arranging them on a plate, covering with plastic wrap, and refrigerating them prior to assembly. Just remember to assemble the crackers shortly before serving to maintain their delightful crunch. Simply place the cheese on the crackers, add the pepperoni for ears, and finish with the mini chocolate chips and cucumber whiskers for a charming presentation. This way, you’ll save valuable time while still delighting your kids with these adorable snacks!
Expert Tips for Mouse Cheese Crackers
- Timing Matters: Assemble your Mouse Cheese Crackers just before serving to prevent the crackers from getting soggy.
- Stay Cool: Keep your cheese refrigerated until you’re ready to use it. This helps maintain its shape and makes assembly easier.
- Encourage Creativity: Let kids experiment with different toppings and shapes! This makes the experience more engaging and personalizes each mouse.
- Cheese Alternatives: If you’re looking for variety, try using different cheeses like Brie or even a dairy-free option for dietary preferences.
- Try Different Bases: Swap out traditional crackers for toasted bread triangles for a more gourmet touch. It’s a simple way to elevate your Mouse Cheese Crackers!
Remember, these Mouse Cheese Crackers are the cutest appetizers that bring joy to gatherings while being effortlessly fun to create!
What to Serve with Mouse Cheese Crackers?
Looking to build an unforgettable snack spread for your next gathering?
- Fruit Skewers: Bright, juicy fruits add a burst of flavor that complements the creamy cheese in each bite.
- Veggie Sticks with Dip: Colorful veggies paired with hummus or ranch dressing provide a crunchy contrast and keep things fresh!
- Mini Sandwiches: Bite-sized sandwiches filled with creamy cheese or ham make for a delightful duo, enhancing the playful vibe.
- Pasta Salad: A zesty pasta salad brings a filling element to your spread, balancing the lightness of the cheese crackers perfectly.
- Sparkling Lemonade: This refreshing drink will quench thirst and add a zingy kick that pairs beautifully with the playful flavors.
- Chocolate Dipped Pretzels: End on a sweet note with these treats that provide a fun, crunchy finish and a touch of indulgence.
- Cheese Platter: Elevate your snack table with a variety of cheeses to complement the Mouse Cheese Crackers for cheese enthusiasts!
Combining these delicious elements will create a well-rounded table that keeps everyone smiling and satisfied!
Mouse Cheese Crackers Variations
Customize your Mouse Cheese Crackers for a delightful twist that sparks excitement and culinary creativity!
- Bread Base: Replace crackers with miniature toasted bread triangles for a heartier option. This adds a chewy contrast to the creamy cheese.
- Cheese Swaps: Experiment with different cheeses like Brie or pepper jack for added flavor and richness. Each cheese brings a unique taste experience.
- Fruit Fun: Add small fruit pieces like grapes or berries instead of chocolate chips for a sweet touch. The burst of fruity flavor brightens each bite.
- Veggie Whiskers: Swap cucumber for carrot sticks or bell pepper strips for a pop of color and crunch. It’s a vibrant way to jazz up the presentation!
- Sweet Treats: For a dessert version, use whipped cream for the cheese and graham crackers for a base, topped with fruits to create a playful and indulgent treat.
- Herb Sprinkles: Add fresh herbs like dill or chives for an herbal touch that elevates the flavor profile while making it visually appealing.
- Spicy Kick: For the daring, use spicy pepperoni or even jalapeños for added heat; it’s a perfect way to spice up a gathering with bold flavors.
- Dip Delight: Serve with a side of ranch or yogurt dip for a delightful pairing that enhances the overall snack experience and adds an extra layer of flavor.
How to Store and Freeze Mouse Cheese Crackers
- Room Temperature: Ideally, serve Mouse Cheese Crackers fresh to enjoy their crispy texture. If left out, consume within 2 hours to ensure they remain tasty and safe.
- Fridge: If you have leftovers, store assembled Mouse Cheese Crackers in an airtight container in the fridge for up to 1 day. However, they are best enjoyed fresh for optimum texture.
- Freezer: Freezing is not recommended for Mouse Cheese Crackers, as the creamy cheese and crisp crackers do not hold up well once thawed. It’s best to prepare them fresh whenever you can!
- Reheating: There’s no need to reheat these crackers. Just serve them chilled from the fridge or at room temperature for the best flavor and presentation!
Mouse Cheese Crackers Recipe FAQs
What type of cheese is best for Mouse Cheese Crackers?
Absolutely! The best choice is a creamy triangle cheese like Laughing Cow, as it maintains its shape and flavor. If you want to experiment, Brie or goat cheese are delightful alternatives that can add a unique twist to your mice creations.
How long can I store Mouse Cheese Crackers?
You can store any leftover assembled Mouse Cheese Crackers in an airtight container in the fridge for up to 1 day. However, I recommend serving them fresh on the same day, as they tend to lose their delightful crunch and texture when stored, becoming less enjoyable.
Can I freeze Mouse Cheese Crackers?
Not really! Freezing is not recommended for these Mouse Cheese Crackers, as the combination of creamy cheese and crispy crackers doesn’t hold up well once thawed. They’ll lose their charm and texture. It’s best to prepare them fresh whenever you’re ready to serve!
What should I do if my crackers become soggy?
Keep your cheese refrigerated until you’re ready to assemble, and try to put the crackers together just before serving. If they do become soggy, you can present them on a platter right away, but aim for a quick assembly to keep them deliciously crisp!
Are there any dietary considerations with this recipe?
Yes! If you’re making these as a snack for kids, it’s important to consider allergies. For instance, some children may be allergic to dairy or certain meats. You can swap out cheese for a dairy-free option and use veggies instead of pepperoni to ensure everyone can enjoy these adorable Mouse Cheese Crackers.
Can I use different toppings for the Mouse Cheese Crackers?
Very! Feel free to get creative— you can substitute mini chocolate chips with raisins or other small candies for eyes, and sliced carrots can replace cucumbers for whiskers. This versatility allows each child to craft their own unique Mouse Cheese Crackers, making snack time even more fun!

Mouse Cheese Crackers Are The Cutest Appetizers for Kids
Ingredients
Equipment
Method
- Prepare the pepperoni by slicing it into mini rounds for ears and small pieces for the nose.
- Place a slice of triangle cheese on each cracker to form the mouse's head.
- Arrange the mini chocolate chips on the cheese to create charming eyes, then add the pepperoni slices for ears.
- Cut slivers of cucumber and place them on the sides of the cracker as whiskers.

