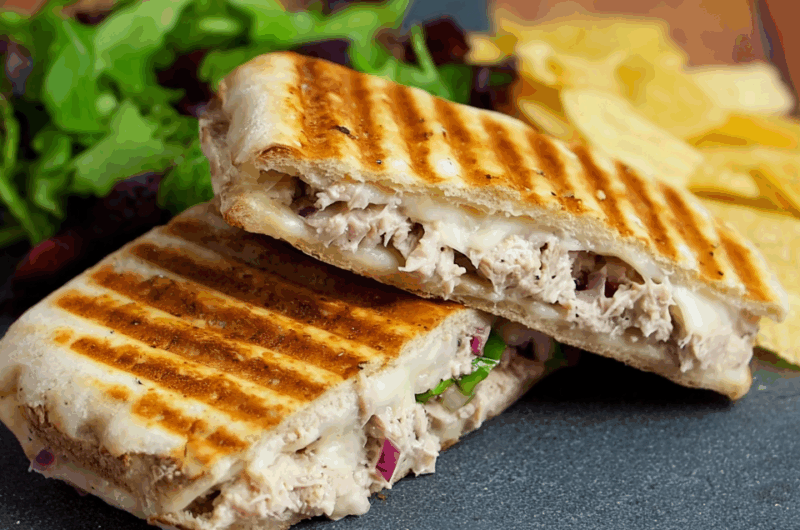
The Tuna and Cheese Melt Panini is the perfect lunchtime hero when you need something warm, melty, and ultra-satisfying in under 10 minutes. The tuna mayo mixture is zingy and creamy, perfectly balanced with the mild sweetness of red onions and a hint of vinegar for an extra pop of flavor.
Pressed between buttery panini rolls and layered with molten slices of cheese, this sandwich is grilled to golden perfection. Each bite is a delightful combination of textures — crispy on the outside, rich and gooey inside. Whether you’re making a quick lunch or a comforting dinner, this is the kind of meal that brings cozy café vibes right to your kitchen.
Full Recipe:
-
2 Panini Rolls
-
4 Slices Mozzarella or Cheddar Cheese (pre-sliced recommended)
For Tuna Mayo Filling:
-
1 Tin Tuna
-
½ Red Onion, finely chopped
-
3 tbsp Light Mayonnaise
-
A splash of Sherry Vinegar (or Balsamic Vinegar)
-
A pinch of Paprika
-
Black Pepper, to taste
Directions:
-
In a bowl, mix together tuna, finely chopped red onion, mayonnaise, a splash of vinegar, paprika, and black pepper to create the tuna mayo mixture.
-
Lightly spread mayonnaise on both cut sides of the panini rolls.
-
Place one cheese slice on the bottom half of each roll.
-
Add a generous portion of tuna mayo mixture over the cheese.
-
Top with another cheese slice and close with the top half of the roll.
-
Preheat your grill (George Foreman or OptiGrill works best) and lightly spray both plates with oil.
-
Place the panini inside, gently close the lid, and grill for 4–5 minutes or until the roll is crisp and the cheese is fully melted.
-
Slice in half and serve immediately with a side of crisps, chips, or salad.
Prep Time: 5 minutes | Cooking Time: 5 minutes | Total Time: 10 minutes
Kcal: 514 kcal | Servings: 2 servings
The Ultimate Guide to Making a Tuna and Cheese Melt Panini
The humble sandwich has long been a lunchtime staple across the world. From cold ham and cheese to grilled Reubens, few things rival the comfort and satisfaction of a well-made sandwich. One of the most iconic and flavorful options you can prepare with minimal effort is the Tuna and Cheese Melt Panini. This sandwich combines creamy, savory tuna mayo with the gooey indulgence of melted cheese, all pressed between crispy panini rolls.
Perfect for busy weekdays, lazy weekends, or even an impromptu brunch, this recipe brings café-quality flavor into your own kitchen. Let’s explore the full story behind this delicious dish — from its origins and versatility to customization options, serving suggestions, and why it deserves a permanent place in your home cooking repertoire.
Why a Tuna Melt is a Classic
The tuna melt has a long-standing place in American and British comfort food culture. Traditionally served as an open-faced sandwich or grilled on sliced bread, the beauty of a tuna melt lies in its simplicity and flavor. The creamy tuna mayo filling balances beautifully with the rich, melted cheese and the satisfying crunch of toasted bread.
By transforming it into a panini — a grilled, pressed sandwich typically made using a ridged grill or sandwich press — you elevate the dish to a whole new level. The heat from the grill not only crisps the outer bread layers but also helps the cheese seep into the tuna mixture, creating a unified bite that’s warm, comforting, and utterly craveable.
The Panini Press Advantage
Using a panini press or grill like a George Foreman or OptiGrill ensures that your sandwich comes out consistently golden and evenly melted every time. Unlike traditional stovetop methods, which can sometimes lead to uneven cooking or soggy bread, a panini press gives you the perfect crunch without flipping. This even heat distribution seals in flavor while transforming the outer layer into a beautifully crisp shell.
If you don’t own a panini press, you can replicate a similar result by placing your sandwich in a hot skillet and using a second heavy pan to press it down. The goal is to achieve a compact, crisped-up result with melted cheese oozing slightly at the edges — a sign of sandwich success!
The Magic of Tuna Mayo
The real star of this dish is the tuna mayo filling. It’s more than just canned tuna and mayonnaise. The addition of finely chopped red onion brings a pop of freshness and a bit of crunch, while a splash of sherry vinegar or balsamic vinegar introduces a subtle tang that cuts through the richness. A pinch of paprika adds warmth and depth, making every bite layered with flavor.
This tuna mixture can be prepared in advance and stored in the fridge for 2–3 days, making this recipe even more convenient for meal prep. It’s ideal not only for paninis but also for wraps, baked potatoes, or even as a dip with crackers.
Choosing the Right Cheese
The cheese you use can dramatically affect the outcome of the melt. Classic cheddar offers sharpness and depth, while mozzarella provides that beloved stretch and gooey texture. For an elevated twist, you might consider blending cheeses — perhaps cheddar for flavor and mozzarella for meltability.
Whichever cheese you choose, ensure it melts well and pairs nicely with the tuna. Avoid dry, crumbly cheeses that won’t integrate smoothly or melt fully under heat.
Best Bread Options for Paninis
Panini rolls are specifically designed for pressing — they’re hearty enough to hold up under pressure and retain a crispy exterior while keeping the inside soft and flavorful. If panini rolls aren’t available, ciabatta or baguettes make excellent alternatives. The key is to choose a roll that won’t fall apart during grilling and has enough surface area for even toasting.
Pre-slicing your roll before assembling and pressing is important. Some people like to butter the outside of the bread for added richness and golden color, but with paninis, this is optional since the press generally does a great job of browning on its own — especially with a light spray of oil.
Serving Suggestions for a Complete Meal
While the Tuna and Cheese Melt Panini is satisfying on its own, pairing it with the right sides can elevate your meal to a more complete and balanced plate.
-
Crisps or Chips: A classic pairing. Choose kettle-cooked crisps for extra crunch or opt for air-fried chips if you want a healthier side.
-
Salads: A fresh green salad with a tangy vinaigrette balances the richness of the panini. Try arugula with lemon dressing or a coleslaw for texture.
-
Soups: This sandwich pairs beautifully with soups like tomato basil, creamy leek, or a classic vegetable broth.
-
Pickles or Gherkins: The acidity helps cleanse the palate and adds an extra layer of flavor.
These combinations are perfect whether you’re serving lunch to guests or treating yourself to a cozy solo meal.
Kid-Friendly and Customizable
This recipe is wonderfully adaptable for families. Kids often love the simplicity of tuna and cheese, especially when it’s melty and served warm. If your children are picky eaters, you can omit the onion or reduce the paprika to keep the flavor milder.
For adults, consider experimenting with additions like sliced tomatoes, baby spinach, or even jalapeños for a spicy twist. You could also substitute the tuna with shredded chicken or swap the mayonnaise for Greek yogurt for a lighter version.
Storage and Make-Ahead Tips
If you’ve made extra tuna filling, it stores well in an airtight container in the fridge for 2–3 days. The assembled panini is best eaten fresh, but if necessary, you can wrap it in foil and reheat it in a toaster oven or skillet. Avoid microwaving as it can make the bread soggy.
Pre-assembling the sandwich (without grilling) is also a great option for meal prepping. Simply refrigerate and grill when ready.
Health Profile and Nutritional Highlights
At around 500 kcal per serving, this panini is relatively balanced for a main meal. It offers:
-
High-quality protein from tuna and cheese
-
Healthy fats from mayonnaise and cheese
-
Carbohydrates from the bread for energy
-
Micronutrients like Vitamin A, calcium, iron, and potassium
To make it lighter, you can use low-fat cheese, light mayo, or a thinner slice of bread. You can even turn this into a low-carb version by using lettuce wraps or whole wheat tortillas.
Conclusion: A Must-Try Panini for All Seasons
The Tuna and Cheese Melt Panini is the kind of recipe that perfectly blends comfort with simplicity. It doesn’t require exotic ingredients, expensive kitchen gadgets, or much time — yet delivers a rich, satisfying experience every single time. Whether you’re in need of a warm lunch on a cold day or a quick bite during your busy schedule, this panini delivers taste, convenience, and joy in every bite.
Its versatility also means you can make it your own, adding whatever ingredients you like or adjusting it to suit your dietary needs. It’s budget-friendly, kid-approved, and endlessly customizable.

