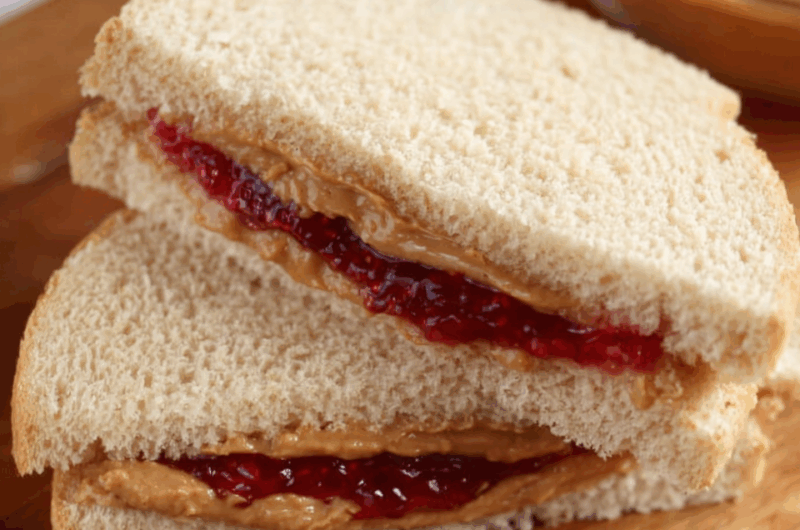
The beauty of these Homemade Freezer Uncrustables lies in their simplicity and practicality. They take only 15 minutes to make, use basic pantry ingredients, and can last in the freezer for months. With just a sandwich sealer and a little prep, you’ve got a stack of ready-to-go crustless peanut butter and jelly sandwiches—perfect for busy mornings, lunchboxes, or afternoon snacks.
Best of all, they’re highly customizable. Swap peanut butter for almond or sunflower butter, try different jams, or even add banana slices or chia seeds. Whether you’re prepping for back-to-school, long road trips, or just want something quick and comforting on hand, this recipe is a total mom win.
Full Recipe:
-
2 loaves of soft whole wheat bread (24 slices each)
-
1 jar natural peanut butter or nut-free spread
-
1 (19 oz) squeezable bottle of Smuckers Natural Strawberry Spread (or your favorite fruit jam)
Directions:
-
Lay out 24 slices of bread on a clean surface.
-
Spread 1 tablespoon of peanut butter in the center of each slice, avoiding the edges.
-
On half of the slices, add 1 tablespoon of jelly over the peanut butter.
-
Top each jelly slice with another peanut-buttered slice to form sandwiches.
-
Use a sandwich sealer or cutter to press and seal the edges, removing the crusts.
-
Place finished sandwiches in a freezer-safe Ziploc bag, stacking with parchment paper between layers.
-
Store in the freezer for up to 3 months. Thaw at room temperature before serving.
Prep Time: 15 minutes | Cooking Time: 0 minutes | Total Time: 15 minutes
Kcal: 147 kcal | Servings: 12
Why Homemade Uncrustables Are Worth Making
If you’re a busy parent or caregiver, you know that mornings can be hectic. Between making breakfast, packing lunches, and getting everyone out the door, there’s often little time left to focus on preparing wholesome, kid-approved meals. That’s where homemade freezer Uncrustables come in. These easy-to-make, crustless peanut butter and jelly sandwiches are a simple solution for time-starved families who want to save money and serve healthier meals.
Smuckers Uncrustables may be convenient, but they come at a premium price and often contain added sugars, preservatives, and processed ingredients. When you make your own version at home, you take full control over the ingredients your family consumes—choosing quality breads, natural nut butters, and fruit spreads without the additives. You also avoid excess packaging and reduce waste by customizing portions to your needs.
A Time-Saving School Lunch Hack
One of the biggest advantages of homemade Uncrustables is how they simplify school mornings. By prepping a batch of sandwiches in advance and freezing them, you instantly have ready-made lunches for weeks. Just pull one from the freezer, toss it into a lunchbox, and it’s thawed and ready to eat by noon. This kind of batch cooking is a sanity-saver for parents, particularly during the school year when time is tight.
Parents who make these sandwiches in bulk often find that preparing a month’s worth takes less than 30 minutes. That’s dozens of future lunches that require zero effort on busy mornings. It’s meal prep at its finest—practical, affordable, and kid-approved.
Customizable for Different Diets and Preferences
One of the best parts of DIY Uncrustables is the ability to customize them to fit your family’s dietary needs or taste preferences. From peanut allergies to gluten intolerance, it’s easy to adapt the sandwich to your unique household requirements.
-
Nut-Free Alternatives: Use sunflower seed butter or soy butter instead of peanut butter for a school-safe option.
-
Low-Sugar or Organic Jams: Swap sugary jelly for an organic fruit spread or a no-added-sugar preserve to reduce sugar intake.
-
Gluten-Free Bread: Choose a soft, gluten-free bread that seals well for those avoiding wheat.
-
Different Fillings: Get creative! Banana slices, Nutella, cream cheese and berries, or hummus with thinly sliced cucumbers all make fun alternatives for kids who like variety.
This flexibility not only keeps your kids happy, but it also introduces them to new tastes and textures in a familiar format.
Budget-Friendly and Eco-Conscious
If you’re spending $4–$6 on a box of store-bought Uncrustables, the cost adds up fast—especially for large families or daily lunch packers. By purchasing ingredients in bulk and using tools you already have at home, you can save up to 70% or more compared to the packaged alternative.
Making your own sandwiches also reduces single-use plastic waste and unnecessary packaging. When you store your DIY Uncrustables in reusable silicone bags or freezer-safe containers, you’re minimizing your environmental impact without sacrificing convenience.
This recipe also minimizes food waste by giving you the opportunity to reuse leftover crusts. Some parents toast them into breadcrumbs or croutons, while others use them for casseroles or simply snack on them. If you keep backyard chickens or compost at home, the crusts won’t go to waste either.
Kid-Friendly, Parent-Approved
Let’s face it—kids can be picky eaters. But Uncrustables have long been a lunchbox favorite thanks to their soft texture, sweet filling, and easy-to-eat shape. When you make them at home, you get the same appeal with none of the questionable ingredients. Plus, the round, sealed edges make them mess-free and portable, perfect for school, sports practice, road trips, or even snack time at home.
Because the process is so simple, you can also turn it into a fun family activity. Let your kids spread the peanut butter, pick their favorite jam flavors, or help with the sandwich cutter. Getting them involved helps them take ownership over their meals and makes them more likely to eat what they helped create.
Choosing the Right Tools and Ingredients
To create the signature “Uncrustable” look and seal, you’ll want to invest in a sandwich sealer or cutter. While there are many inexpensive options available online, most parents recommend a stainless-steel version with a strong press mechanism to ensure a clean cut and solid seal. You can also use a biscuit cutter or even a wide-mouth glass in a pinch, but the results may vary.
When choosing bread, softness is key. Soft, pillowy bread seals better and keeps a pleasant texture after freezing. Dry or dense bread tends to crack or resist sealing, which can lead to leaks or an unappetizing thawed texture.
Peanut butter (or your preferred spread) should be thick enough to act as a barrier against jelly seepage. By applying a thin layer of peanut butter to both sides of the bread, you help lock the jelly in place and avoid soggy sandwiches. For jelly, squeezable tubes are often the easiest to work with, especially when prepping a large batch.
Smart Freezing Tips for Best Results
Once your sandwiches are assembled and sealed, it’s time to store them for future use. Lay them in a single layer on a baking sheet or tray and flash freeze them for about an hour before stacking. This keeps them from sticking together. Afterward, you can layer them in a gallon-sized Ziploc bag or reusable freezer container with parchment paper between each sandwich.
Properly stored, homemade Uncrustables will stay fresh for up to 3 months in the freezer. When packed in a lunchbox straight from the freezer, they typically thaw by lunchtime and maintain a soft, satisfying texture.
You can also store them in the refrigerator if they’ll be eaten within 24 hours. Beyond that, they may start to become soggy due to moisture migration from the jelly.
Not Just for PB&J Lovers
While peanut butter and jelly may be the classic combo, the possibilities for fillings are nearly endless. Consider experimenting with:
-
Chocolate hazelnut spread and banana
-
Ham and cheese (for non-freezer versions)
-
Cream cheese and blueberries
-
Hummus and shredded carrots
-
Turkey with cranberry sauce
These creative spins work well for picky eaters or for adding variety to your lunchbox rotation. Note that not all combinations freeze equally well, so it’s best to test in small batches when trying new fillings.
Safe for Allergy-Conscious Environments
With more schools enforcing nut-free policies, having a reliable, allergy-safe lunch option is crucial. By using sunflower butter or soy butter, and choosing allergy-safe breads, you can craft a sandwich that complies with school rules without sacrificing flavor or texture.
This also gives peace of mind to parents with children who suffer from food allergies. Rather than worrying about ingredient labels or cross-contamination in packaged products, you know exactly what went into each sandwich—and can tailor it to your child’s specific dietary needs.
Conclusion: A Simple Solution with Major Payoffs
Homemade freezer Uncrustables are a perfect storm of simplicity, savings, and satisfaction. They’re easy to make, loved by kids, and versatile enough to adapt to virtually any dietary requirement. By spending just a short amount of time one day a month, you can eliminate the stress of daily lunch prep and have nutritious, kid-approved meals ready to go.
In a world where convenience often comes at the cost of health and budget, this DIY lunchbox staple offers a better way. With full control over ingredients, flavor, and quality, these sandwiches prove that sometimes, the best solutions really are the simplest.
Whether you’re preparing for back-to-school, managing multiple dietary restrictions, or just trying to streamline your morning routine, adding homemade Uncrustables to your meal prep strategy is a small habit that delivers big rewards.
